Threat Hunting to Detection Engineering, Part 2: Validating Rules Against Live Malware with Claude and LimaCharlie
Senior Solutions Engineer
In Part 1, we looked at how to use Claude to analyze an unknown binary given a basic Linux system. Analysis is only half of the job, though, and while we can reasonably assume that our rules will work, especially for high-fidelity indicators such as hashes and IPs, rules looking for behaviors get more challenging to build and validate.
So in this part, I wanted to see how much I could hand off to Claude: take the indicators from the analysis, write detection rules, stand up a Windows sandbox in Azure, install the EDR sensor, detonate live malware on it, check whether the rules fired, fix what didn't, and test again. Four of the eight rules created from just static analysis didn't fire after the first run of the malware. After having Claude investigate and update the rules, all eight fired as expected. The entire exercise, from empty Azure subscription to a set of rules validated against the malware's execution, cost around $0.36 for the Azure resources. Full disclosure: the tokens used were against my monthly Claude Max 5x subscription, so I didn't incur any token cost.
A note about the screenshots: I've run through this a few times, so you'll spot minor differences between them, like rule names that changed between runs. Frontier models (Opus, GPT, etc.) are non-deterministic, meaning the same prompt can take a different path each time, so while I ran the exact same sample through multiple times with the exact same prompts, no two runs produced identical output.
Important: The org in this post has already been deleted. In fact, one of the points of this post is to show how quickly and easily I can stand up and tear down a sandboxed environment without impacting a production environment, which includes the LimaCharlie platform. The screenshots are intentionally left unedited because you can't use any of the info anyway. Don't waste time emailing me that you found leaked keys in the post.
The LimaCharlie AI Terminal
One of the most powerful tools in the LimaCharlie platform is the AI Terminal. This is a web-based instance of Claude Code, fully integrated with the LimaCharlie platform, that ships with a full suite of reverse engineering tools to aid in malware analysis. The AI Terminal can be accessed from the LimaCharlie platform by clicking the "AI Terminal" button in the top right corner of the screen. The AI Terminal does require you to bring your own Claude Code subscription or Anthropic/Bedrock key.
However, none of what I did here is limited to the LimaCharlie AI Terminal. You can just as easily build your own environment and use the prompts included in this post.
The AI Terminal includes:
LimaCharlie CLI
LimaCharlie Reverse Engineering + Ghidra + Java
LimaCharlie AI Integrations (plugins, skills, etc.)
LimaCharlie Documentation
Cloud CLIs (Azure, GCP, DigitalOcean, AWS, etc.)
A pretty interface
Running the Analysis
Since Part 1 covered this in depth, I'll quickly go over how I did this using the AI Terminal in LimaCharlie rather than the Claude Code CLI. The sample I'm using is a random download from Malware Bazaar. If you'd like to follow along, feel free to grab your own sample or search for ee0f9dfaaa11a770fa0543be2ebe9be3f6ab38c1bdd642d778c15b644a0b5278 in Malware Bazaar to grab the same file I used.
The prompts that I used to run through this (or very similar to) are included in this post to show how I'm able to use natural language to interact with the LLM. Included is also an appendix that has prompts that were generated by the LLM after I finished the session to allow someone else to repeat this analysis with mostly predictable results.
The appendix can be found here: Prompts to Replicate this Workflow
Warning: I used LIVE malware for this and purposefully picked one that was suspected of being malicious, but I also made sure it wouldn't run on my OS to eliminate risk of compromising my system. If you choose to perform these steps, take precautions. Don't do this on your corporate laptop, unless you want to hear from your friendly DFIR team.
This was the prompt I used to kick off the AI terminal session. Something to note: The last line of the prompt is necessary because the additional functionality of the AI Terminal only becomes available once a session has started. The prompt gets the session created and sets the stage with the LLM on what we're attempting to accomplish. This way I didn't have the LLM start randomly looking for a suspicious file that didn't exist yet.
Prompt:
You are a malware analyst analyzing an unknown binary. Using the tools available to you, determine the following: 1. If it's malicious 2. Behaviors of the binary 3. IoCs that can be used to write LimaCharlie rules against to detect the malware and/or its behaviors I will upload a malware sample for you to analyze next
Uploading the Sample
Next, I went ahead and uploaded the sample to the AI Terminal. This will then make the file available to the LLM for analysis.
The file has been uploaded and is named ee0f9dfaaa11a770fa0543be2ebe9be3f6ab38c1bdd642d778c15b644a0b5278.zip. The password is infected.
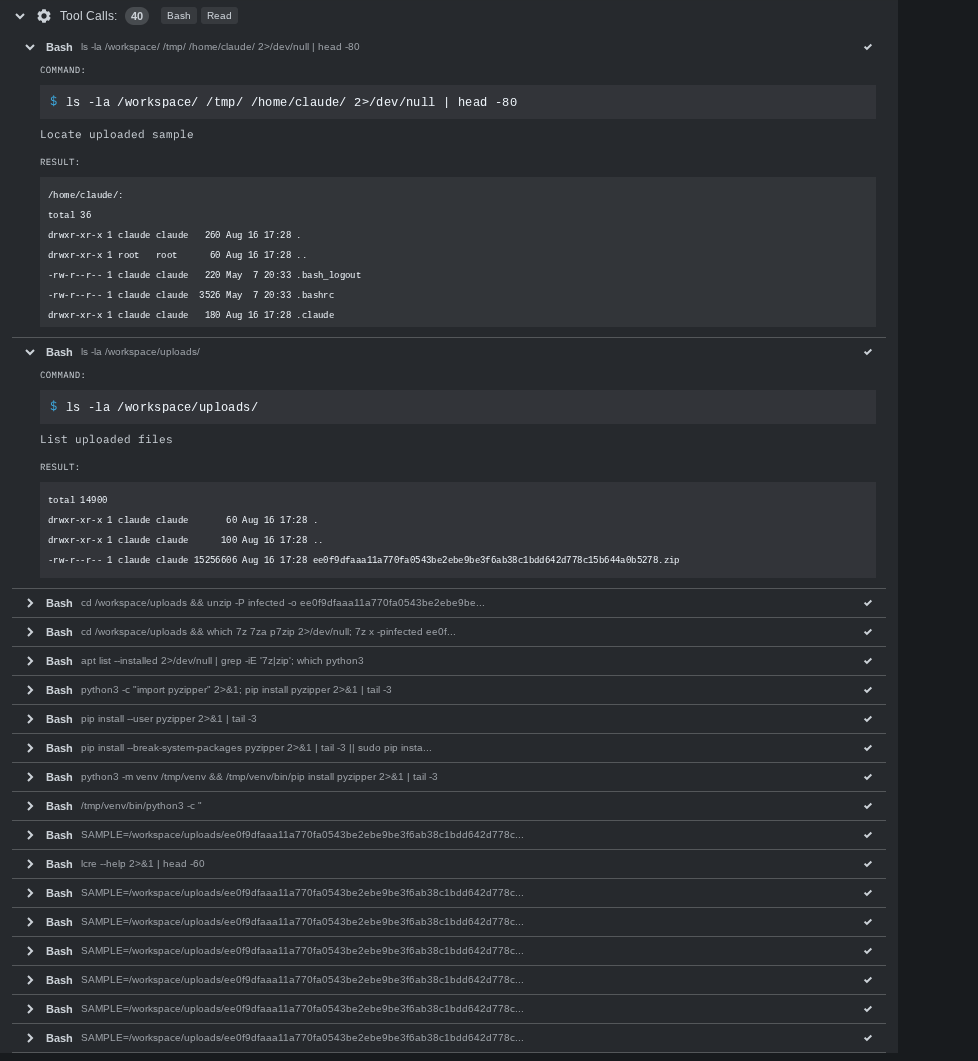
At this point, the LLM starts running through an analysis using the tools on the system. As it progresses, the commands, input, and output are streamed to the session.
Expanding each of these rows allows me to see the commands being executed by Claude to perform the analysis. This is where I validate it's performing the correct operations and ensure it doesn't miss any important analysis techniques. Remember: trust, but verify.
Note: Keep in mind, all LLMs have a training cutoff date and the version you're using may not be up to date on a novel analysis technique. In these cases, you'll want to give the LLM references so it can build the context it would need to perform that technique. If you're ever curious what the cutoff date is for the model you're using, just ask it "What is your training cutoff date?"

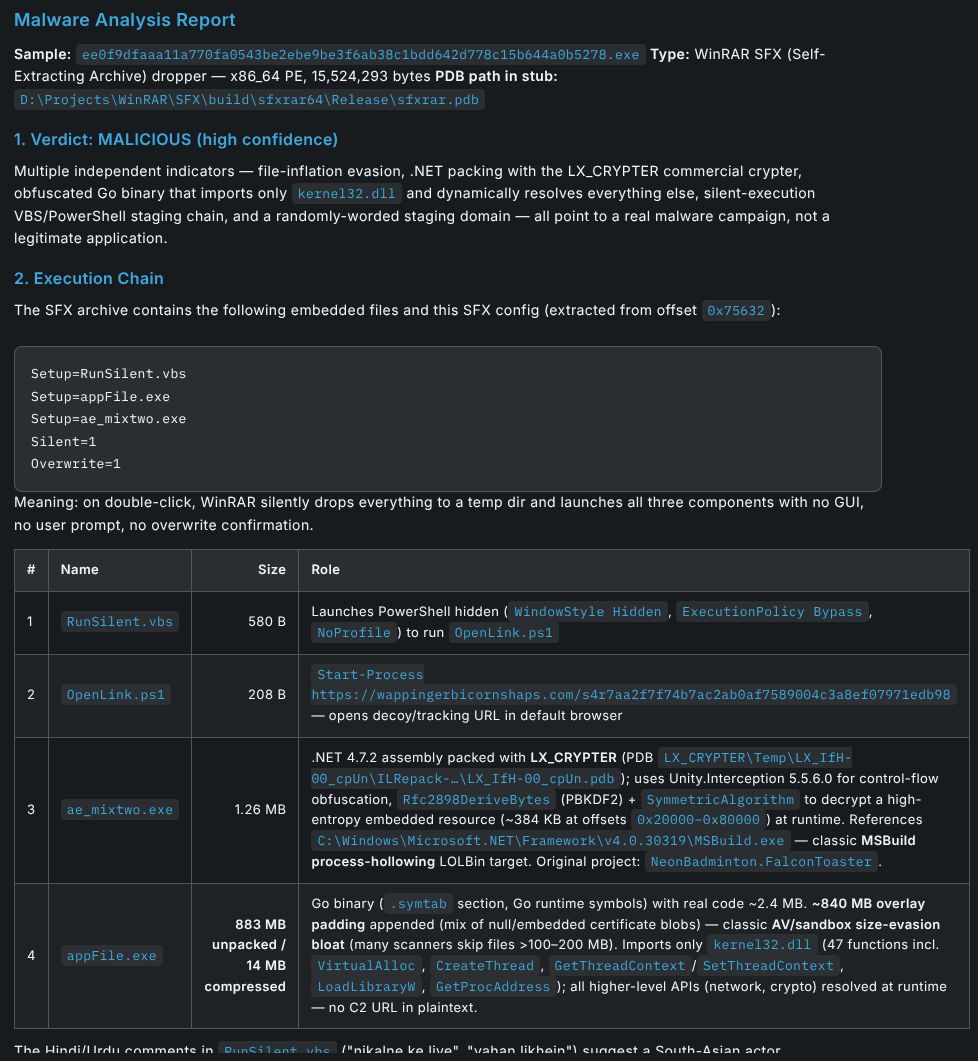
Finally, Claude gave me the analysis. If I had wanted, I could easily have it generate a report at this point like in Part 1, but I'd rather have it generate some detection rules instead.
What the Sample Actually Does
Looking at the report, right off the bat, Claude thinks the file is malicious with high confidence. In the summary, a number of indicators are listed: evasion, packing, obfuscation, silent execution, and calling out to random domains. It practically screams "malware."
Getting into the details of the report, I can see that it's a WinRAR SFX archive that silently drops four files and launches three of them. The behaviors show some interesting characteristics:
The file appears deliberately bloated to evade AV scanning
Obfuscation plus an encrypted payload
Indicators that can be targeted for high-fidelity alerts
Every rule traces directly back to one of the observations contained in the report.
Building Rules
Once the analysis is complete, it's time to put the information found during the analysis to the test and create some rules to detect the malware. The rules can range from extremely specific, such as a hash, to behaviors as the LLM attempts to cover all of the IoCs that were found.
Since I'm using the AI Terminal, the LLM has the context that I'm currently working within LimaCharlie, so it dutifully suggested a number of rules that can be implemented.
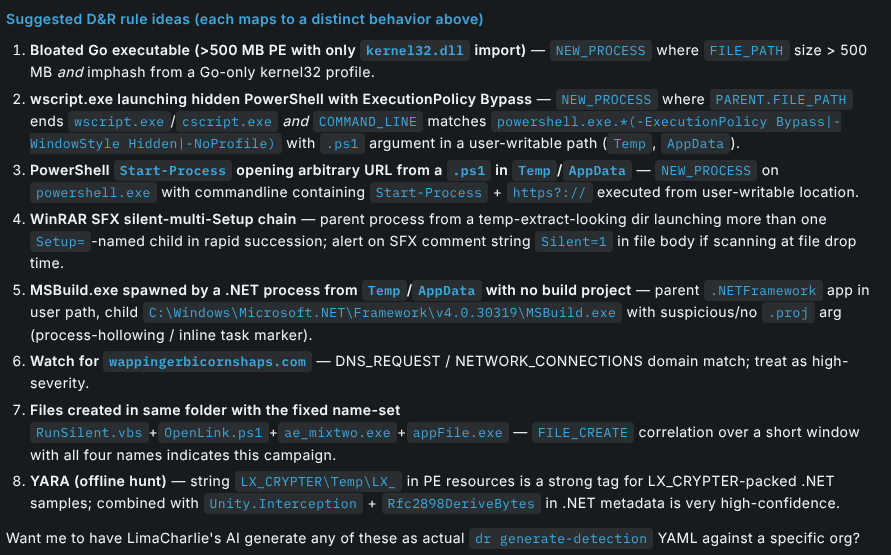
Tip: If rules aren't suggested after completion of the analysis, use this prompt: "Propose 6-10 concrete detection ideas from the analysis that was performed."
I was curious how good the suggested rules were, so I had the LLM build all of them. Before starting, though, I wanted the LLM to work in a test organization so I could prevent co-mingling of my test data with another organization.
Prompt:
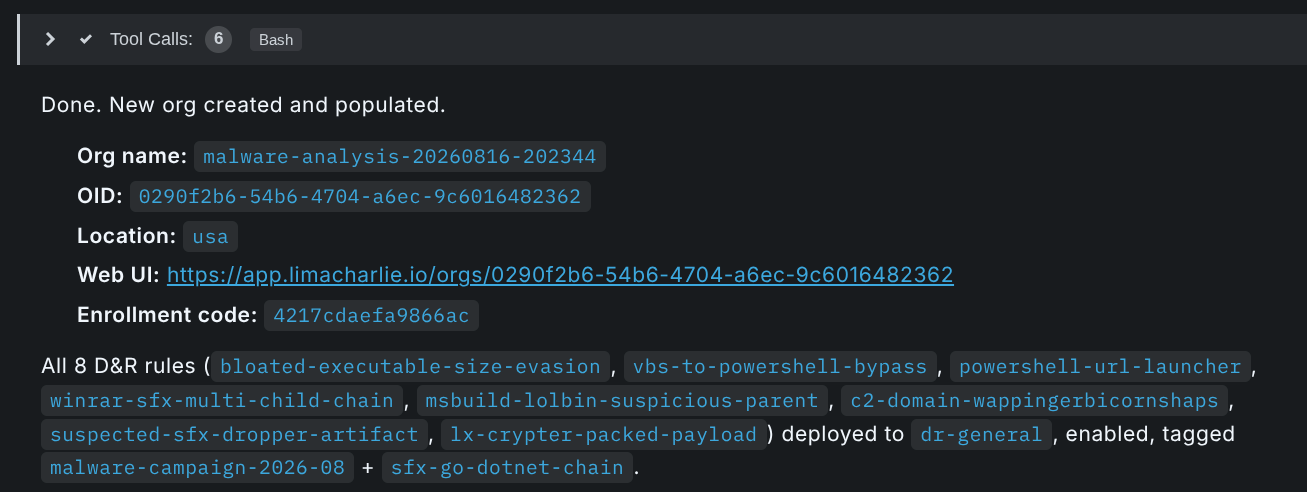
Create a new LimaCharlie organization prefixed with "malware-". Afterwards, continue in the context of the organization you created, ensuring everything you build is deployed to that organization. Create all the suggested rules in the new organization.
Once completed, I had a sandboxed LimaCharlie org populated with the rules and ready for a sensor to be added.
Setting up a Sandbox in Azure
At this point, I have a new org with rules, but I don't know if they actually match when the malware is executed. The LimaCharlie platform offers the ability to replay events against a detection to test them, but (hopefully) this file hasn't been executed on any endpoints since the LLM has determined it's malicious. Instead, I used Claude as an orchestrator to create a new resource group in Azure, deploy a VM, lock it down to prevent collateral damage, and snapshot the VM so I can restore it to a known-good state and run the test(s) as many times as desired.
Another set of tools included with the AI Terminal are cloud CLIs (e.g., Azure, AWS, GCP, 1Password, etc.). By authenticating to a cloud provider, I can hand off this orchestration to Claude from within the AI Terminal. To begin, I told Claude to provide a device code for Azure authentication.
Prompt:
Authenticate to Azure using the device code
Tip: I found that if I didn't specify exactly how I wanted it to do the authentication, it would sometimes use interactive auth, which doesn't work for this application. By telling it to authenticate using a device code, I was able to reliably get it to authenticate correctly. This will likely vary based on the cloud provider.
Now that I'm authenticated, it's time to have fun. To start, I had Claude get the environment set up and ready to go.
Prompt:
Create a new azure resource group prefixed with "malware-" and then create a new windows 2022 VM in that resource group and install the LimaCharlie EDR agent on it. This is going to be used for executing the malware in a sandbox, so ensure controls are in place to prevent sandbox escape
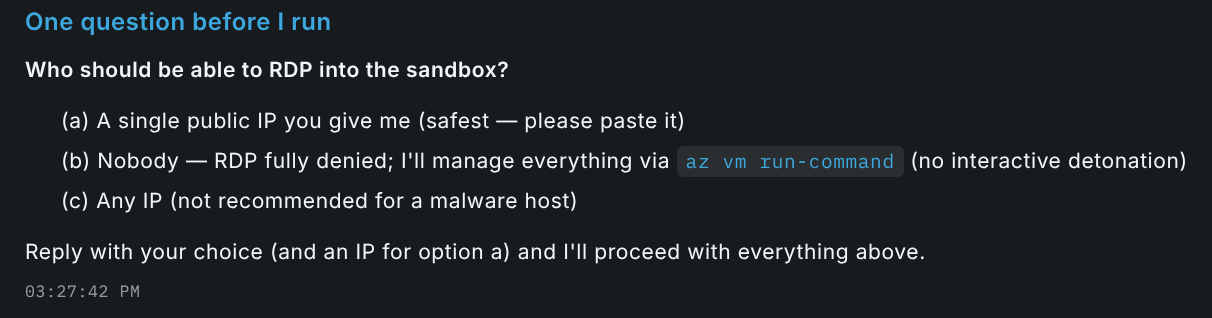
Whoops, looks like I forgot to give Claude some important information.
At this point, Claude took over and built out the environment. Using Opus 5, the environment build took around 30 minutes to complete. An important part of that prompt was the last part telling the LLM what the sandbox will be used for and the controls I want in place.
After I was satisfied it was working and verified it myself, it was time to snapshot it to make it easy to revert later on.
Prompt:
Create a snapshot for a known-good state
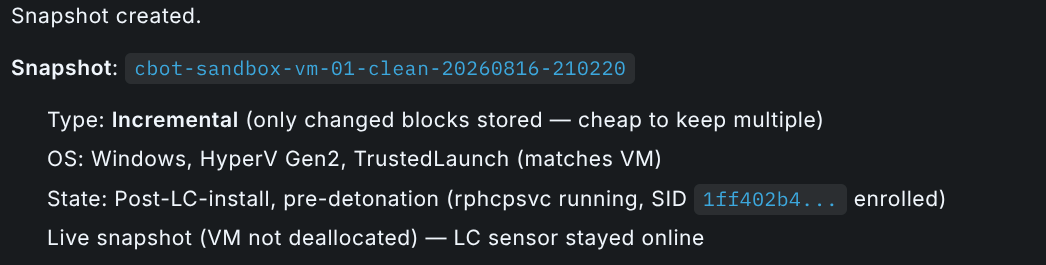
For details on what Claude built, check out the Appendix.
Malware Detonation and Rule Iteration
Now for the fun part. Time to see how well the rules worked by executing the malware on the host. I specifically didn't tell the LLM how to upload the sample to the host so it could figure out a method that works. I also wanted to make sure it waited until some time had passed after the sample executed in case it had any time-based sandbox detection built in.
While I was at it, I went ahead and had the LLM investigate any rules that didn't fire and figure out why.
Prompt:
Upload the sample to the VM and then execute it. Ensure you give it up to 5 minutes if you're not seeing any telemetry. Verify the rules fired. If any of them didn't, determine why, update the rule, and then replay the rule to ensure it fires.
After some time, I saw this message pop up. WOOT!

Four out of eight. Not half bad, but not half good either! This is where the second part of the prompt comes into play. I don't want the LLM to just tell me what didn't work. I want it to figure out why and then fix the rules it created.

Why Half of the Rules Didn't Fire
Rule | Why it didn't fire | Fix |
powershell-url-launcher | URL is inside script, not in cmdline; PS ran -File OpenLink.ps1 with no URL/Start-Process in cmdline | Redetect: powershell.exe -File pointing to .ps1 under \Temp\, \AppData\, or \Users\Public\ with hidden/bypass flags |
msbuild-lolbin-suspicious-parent | Excluded \Windows\ too broadly; malicious parent lives at \Windows\Temp\mwrun\ae_mixtwo.exe (has \Windows) | Exclude specific Windows subdirs (\Windows\System32, \Windows\SysWOW64, \Windows\Microsoft.NET) instead of the whole tree |
c2-domain-wappingerbicornshaps | Rule correct; domain never resolved (Start-Process URL failed silently; no default browser on Server 2022) | Rule unchanged; trigger a manual DNS to prove firing |
lx-crypter-packed-payload | CODE_IDENTITY has no STRINGS field; no LX_CRYPTER YARA rule deployed | Match ORIGINAL_FILE_NAME starts with LX_ on CODE_IDENTITY (found LX_IfH-00_cpUn_i.exe) |
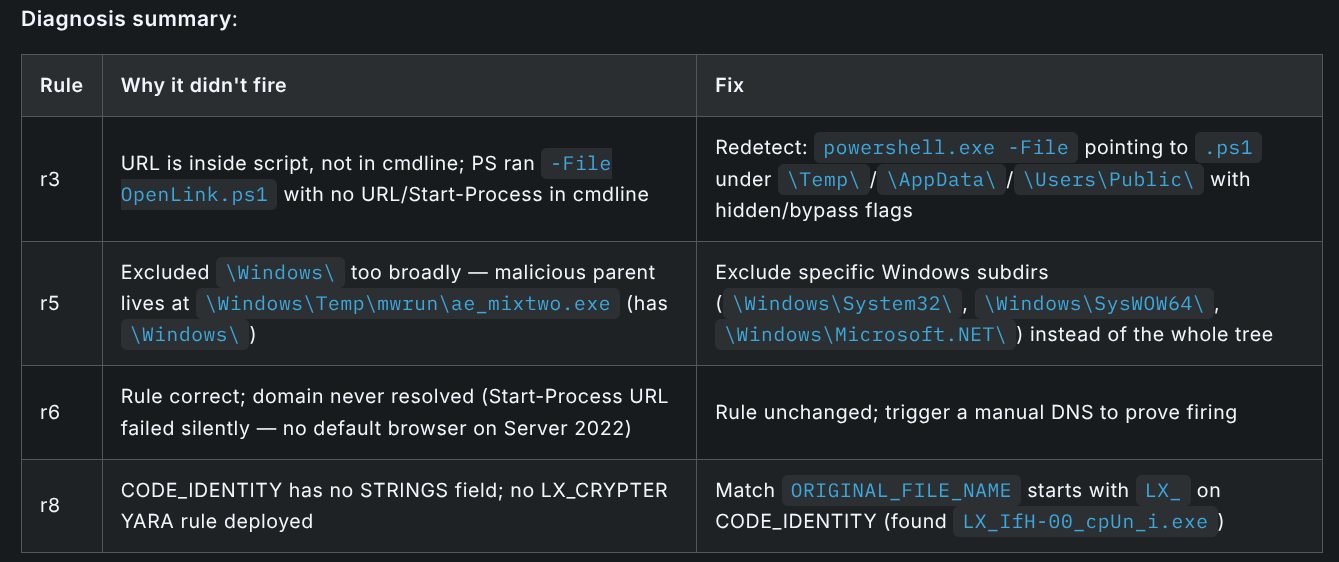
After it finished updating the rules and running them against the historical telemetry that got created with the first run via the LimaCharlie replay functionality, it was time to run it again.
Let's Try This Again
Prompt:
Revert the VM and execute the malware again to verify
BAM. I now have eight rules that I can use to detect this malware that have been validated against execution on a real system. If one or more of the rules had failed again, it'd be worth a human review to guide the LLM and then have it try again. Luckily for me, it worked the second time. Worth remembering: these rules were written entirely from a static analysis by the LLM. Until the first detonation, none of them had been tested against actual execution.
# | Rule | Status |
1 | bloated-executable-suspected-loader | Pass |
2 | vbs-to-powershell-bypass | Pass |
3 | powershell-url-launcher | Pass (fixed) |
4 | winrar-sfx-multi-child-chain | Pass |
5 | msbuild-lolbin-suspicious-parent | Pass (fixed) |
6 | c2-domain-wappingerbicornshaps | Pass (DNS triggered manually; Server 2022 has no default browser) |
7 | suspected-sfx-dropper-artifact | Pass |
8 | lx-crypter-packed-payload | Pass (fixed) |
Cleaning Up
At this point I still had an infected system to deal with. If I wanted to save this environment for future analysis, I could easily have the LLM revert to the known-good snapshot and then deallocate it. This would enable the environment to be stood up more quickly in the future, but with the tradeoff of a small, ongoing cost. In my case, I didn't need any of the Azure resources anymore, so I went ahead and had the LLM clean up its own mess.
Important: Keep in mind, I'm doing this in a completely isolated environment. If your Azure credentials include access to production environments, I highly recommend doing this manually or validating each command before it gets executed. I'm not responsible if you turn on YOLO mode and your production environment gets deleted.
Prompt:
Delete the Azure environment you created
Cost Savings
Handing the whole loop to Claude meant I could analyze an unknown sample and then rapidly create, test, validate, and iterate on the rules in a controlled environment for a whole $0.3619. While this number will vary depending on any number of variables, it's still cheaper than most sandbox providers. If you wanted to avoid using cloud services altogether, you could even do the same on your own system or homelab for free (minus the cost of tokens or your Claude subscription).
Service | Actual cost (USD) |
Virtual Machines | $0.2284 |
NAT Gateway | $0.0952 |
Storage (disks + snapshot + account) | $0.0329 |
Microsoft Defender for Cloud | $0.0200 |
Virtual Network (Public IP) | $0.0054 |
Bandwidth | ~$0.00 |
Total | $0.3619 |
Next Steps
At this point, I have an org with validated rules that I can reasonably trust to add to my rule collection. For my purposes, this is where it ends. However, it doesn't have to be. You could continue on with any number of options:
Generate a report on the analysis, rules, and testing/validation
Deploy the rules to a subset of systems to look for false positives
Add response actions to the high-fidelity alerts (e.g., isolate host when hash is seen, kill the process tree, run a Velociraptor collection, etc.)
Add the rules to your rule pipeline and deploy to your endpoints
Use the process you ran through here to create an AI Agent that will repeat this analysis for you when a malicious file alert is generated
Conclusion
I used Azure for this exercise, but there's nothing about what I've done that is specific to Azure. The AI Terminal ships with multiple CLIs, including GCP, Azure, and AWS. The whole workflow would work the same with a Claude Code CLI given access to a Proxmox box sitting in your laundry room, as long as your LLM has access to the system and understands how to interact with it.
Some clarity on what Claude did and didn't do: Claude ran the analysis, but it didn't invent new analysis techniques. In fact, each and every command Claude executed is visible and can be repeated by a human. It built the environment to my specifications and used its training data to fill in the rest. Sure, I could have built out the same environment by hand and created a Terraform script to make it a repeatable process, but then I've burned a whole afternoon. Instead, through a lot of trial and error on Claude's part, Claude was able to accomplish everything in roughly 90 minutes while I worked on another project.
LLMs are also still prone to hallucinations. While they've gotten much better than even a year ago, it can happen, so don't blindly trust your LLM. During this exercise, the LLM made up fields in LimaCharlie that don't exist. That's the point of "trust, but verify" in this case. Make the LLM prove the information it's providing to you is accurate.
The LLM collapses the hours of setup and iteration that used to make testing a pain, and it cost me $0.36 to do it. Rule validation stopped being expensive enough to skip. Four of the rules didn't fire on the first detonation. Three were genuine bugs in the rules and one was an issue with the environment. I only know that because testing them finally got cheap enough to bother.
Try it Yourself
At LimaCharlie, we encourage people to try our tools out for free, no strings attached, no credit card needed, without having to talk to a sales person (but we'd love it if you would!). With our community edition, each user gets two free organizations and two free sensors per organization, along with access to the AI Terminal, so you can repeat everything I did here. Bring your own Claude subscription, grab your own sample from Malware Bazaar, and try it out. Use the prompts here, in the appendix, or try your own prompts to see what happens.
Sign up for an account here: LimaCharlie Community Edition
If you'd rather start smaller, Part 1 covers just the analysis side on a plain Linux box.
Appendix
Claude's Full Analysis Report
Sample: ee0f9dfaaa11a770fa0543be2ebe9be3f6ab38c1bdd642d778c15b644a0b5278.exe Type: WinRAR SFX (Self-Extracting Archive) dropper, x86_64 PE, 15,524,293 bytes PDB path in stub: D:\Projects\WinRAR\SFX\build\sfxrar64\Release\sfxrar.pdb
1. Verdict: MALICIOUS (high confidence)
Multiple independent indicators, file-inflation evasion, .NET packing with the LX_CRYPTER commercial crypter, obfuscated Go binary that imports only kernel32.dll and dynamically resolves everything else, silent-execution VBS/PowerShell staging chain, and a randomly-worded staging domain, all point to a real malware campaign, not a legitimate application.
2. Execution Chain
The SFX archive contains the following embedded files and this SFX config (extracted from offset 0x75632):
Setup=RunSilent.vbs Setup=appFile.exe Setup=ae_mixtwo.exe Silent=1 Overwrite=1
Meaning: on double-click, WinRAR silently drops everything to a temp dir and launches all three components with no GUI, no user prompt, no overwrite confirmation.
# | File | Size | Role |
1 | RunSilent.vbs | 580 B | Launches PowerShell hidden (WindowStyle Hidden, ExecutionPolicy Bypass, NoProfile) to run OpenLink.ps1 |
2 | OpenLink.ps1 | 208 B | Start-Process https://wappingerbicornshaps[.]com/s4r7aa2f7f74b7ac2ab0af7589004c3a8ef07971edb98, opens decoy/tracking URL in default browser |
3 | ae_mixtwo.exe | 1.26 MB | .NET 4.7.2 assembly packed with LX_CRYPTER (PDB LX_CRYPTER\Temp\LX_IfH-00_cpUn\ILRepack-...\LX_IfH-00_cpUn.pdb); uses Unity.Interception 5.5.6.0 for control-flow obfuscation, Rfc2898DeriveBytes (PBKDF2) + SymmetricAlgorithm to decrypt a high-entropy embedded resource (~384 KB at offsets 0x20000-0x80000) at runtime. References C:\Windows\Microsoft.NET\Framework\v4.0.30319\MSBuild.exe, classic MSBuild process-hollowing LOLBin target. Original project: NeonBadminton.FalconToaster. |
4 | appFile.exe | 883 MB unpacked / 14 MB compressed | Go binary (.symtab section, Go runtime symbols) with real code ~2.4 MB. ~840 MB overlay padding appended (mix of null/embedded certificate blobs), classic AV/sandbox size-evasion bloat (many scanners skip files >100-200 MB). Imports only kernel32.dll (47 functions incl. VirtualAlloc, CreateThread, GetThreadContext/SetThreadContext, LoadLibraryW, GetProcAddress); all higher-level APIs (network, crypto) resolved at runtime, no C2 URL in plaintext. |
The Hindi/Urdu comments in RunSilent.vbs ("nikalne ke liye", "yahan likhein") suggest a South-Asian actor.
3. Behaviors observed
Silent dropping: WinRAR SFX with Silent=1 Overwrite=1 and multi-Setup chain.
Hidden PowerShell staging: VBS to powershell.exe -ExecutionPolicy Bypass -NoProfile -WindowStyle Hidden -File OpenLink.ps1.
Browser hand-off / URL beacon: PowerShell Start-Process opens attacker URL in default browser (either decoy landing page, click/telemetry beacon, or second-stage delivery).
.NET obfuscation via LX_CRYPTER + ILRepack + Unity.Interception: proxy-based interception hides real call graph.
Encrypted embedded payload decrypted at runtime with PBKDF2 + AES.
LOLBin abuse (MSBuild v4.0.30319): hard-coded path suggests process hollowing / inline task execution.
Go executable with binary bloating: 840 MB overlay to evade size-limited scanners; 883 MB unpacked size.
Dynamic API resolution: Go payload only statically imports kernel32.dll; everything else via LoadLibraryW/GetProcAddress.
4. IOCs (for LimaCharlie D&R rules)
Hashes
Artifact | SHA256 |
SFX dropper | ee0f9dfaaa11a770fa0543be2ebe9be3f6ab38c1bdd642d778c15b644a0b5278 |
RunSilent.vbs | df325751b971983c74eec2d16afc4ab0bf159418074e75fc6362e2587473369c |
OpenLink.ps1 | 09ee5443809176dcac8ddd954e2dca7c3ba1d0692fca9394d1f1c78e3d943f42 |
ae_mixtwo.exe (.NET/LX_CRYPTER) | 45148da9d1283d886118b60d07611d41d346d734a89fb44263ee8696f3bf053b |
appFile.exe (Go, bloated) | 093888586d4b023e035f5086cad81ebd1a19ab12c87fb97663aeb6d7f94b0d3e |
Network
Domain: wappingerbicornshaps[.]com
Full URL: https://wappingerbicornshaps[.]com/s4r7aa2f7f74b7ac2ab0af7589004c3a8ef07971edb98
Filenames dropped together (SFX-extract fingerprint)
RunSilent.vbs, OpenLink.ps1, ae_mixtwo.exe, appFile.exe, co-located in the same temp/extract directory.
Suggested D&R rule ideas (each maps to a distinct behavior above)
Bloated Go executable (>500 MB PE with only kernel32.dll import): NEW_PROCESS where FILE_PATH size > 500 MB and imphash from a Go-only kernel32 profile.
wscript.exe launching hidden PowerShell with ExecutionPolicy Bypass: NEW_PROCESS where PARENT.FILE_PATH ends wscript.exe/cscript.exe and COMMAND_LINE matches powershell.exe.*(-ExecutionPolicy Bypass|-WindowStyle Hidden|-NoProfile) with .ps1 argument in a user-writable path (Temp, AppData).
PowerShell Start-Process opening arbitrary URL from a .ps1 in Temp/AppData: NEW_PROCESS on powershell.exe with commandline containing Start-Process + https?:// executed from user-writable location.
WinRAR SFX silent-multi-Setup chain: parent process from a temp-extract-looking dir launching more than one Setup=-named child in rapid succession; alert on SFX comment string Silent=1 in file body if scanning at file drop time.
MSBuild.exe spawned by a .NET process from Temp/AppData with no build project: parent .NETFramework app in user path, child C:\Windows\Microsoft.NET\Framework\v4.0.30319\MSBuild.exe with suspicious/no .proj arg (process-hollowing / inline task marker).
Watch for wappingerbicornshaps[.]com: DNS_REQUEST / NETWORK_CONNECTIONS domain match; treat as high-severity.
Files created in same folder with the fixed name-set RunSilent.vbs+OpenLink.ps1+ae_mixtwo.exe+appFile.exe: FILE_CREATE correlation over a short window with all four names indicates this campaign.
YARA (offline hunt): string LX_CRYPTER\Temp\LX_ in PE resources is a strong tag for LX_CRYPTER-packed .NET samples; combined with Unity.Interception + Rfc2898DeriveBytes in .NET metadata is very high-confidence.
The Environment Claude Built
Compute
cbot-sandbox-vm-01, Windows Server 2022 Datacenter, Standard_D2s_v6, region eastus
TrustedLaunch with Secure Boot and vTPM enabled
No managed identity: the VM holds no credentials in the Azure tenant
OS disk and NIC both set to delete on teardown
Network
sandbox-vnet (10.42.0.0/24) with a single /28 subnet, no peerings
Private IP 10.42.0.4, no public IP on the VM
Egress via NAT gateway sandbox-natgw, one Standard public IP for outbound only, no inbound routing possible
No RDP, no SSH, no bastion. Everything managed through az vm run-command invoke, which goes through the Azure control plane rather than the network
NSG rules (sandbox-nsg, subnet-attached), in evaluation order:
Priority | Rule | Effect |
100 | allow-wireserver to 168.63.129.16 | Required for run-command, DHCP, and health probes |
110 | deny-out-azurecloud | Blocks all Azure Storage/Key Vault/ARM egress |
120 | deny-out-imds to 169.254.169.254 | NSGs can't actually filter link-local, so this is belt-and-suspenders; the real mitigation is the missing managed identity |
130 | deny-out-rfc1918 | 10/8, 172.16/12, 192.168/16, no pivot to private space |
140 | deny-out-smb-netbios-winrm-rpc | Ports 135, 137-139, 445, 5985-5986 |
200 | deny-out-virtualnetwork | Blocks lateral movement inside the VNet |
4000 | deny-all-inbound-internet | No inbound from Internet at all |
65001 | AllowInternetOutBound (Azure default) | Left in place so C2 is reachable and observable |
Prompts to Replicate This Workflow
Paste each of these into the LimaCharlie AI Terminal in order. The AI Terminal will drive the Azure CLI, the limacharlie CLI, and produce/deploy the rules on your behalf. Substitute your own org name and sample hash.
Phase 1: Stand up the Azure sandbox
Create an isolated malware-analysis sandbox in my Azure subscription (region East US): - Resource group named malware-sandbox-<timestamp> - Windows Server 2022 VM, Standard_D2s_v6, TrustedLaunch with Secure Boot and vTPM - No public IP on the VM, and no managed identity. Use a NAT gateway for outbound. - No RDP. Manage the VM entirely through az vm run-command. - NSG on the subnet: - Allow outbound to the Azure wire server (168.63.129.16) at priority 100, without this, run-command and the sensor install will both fail. - Deny outbound to AzureCloud, IMDS (169.254.169.254), RFC1918, VirtualNetwork, and SMB/RPC/NetBIOS/WinRM ports (135, 137-139, 445, 5985-5986). - Leave the default AllowInternetOutBound rule in place so the sensor can reach LimaCharlie and the malware's C2 traffic is observable. - Note: Azure NSG minimum priority is 100, so order your rules accordingly. - Install the LimaCharlie Windows sensor into my "malware-" org. Verify the sensor is online before continuing.
Phase 2: Statically triage the uploaded binary
Upload the sample to the AI Terminal first (drag-and-drop, or drop it into the mounted uploads dir). Then paste:
I've uploaded an unknown Windows binary. Do a full pre-detonation static triage before we build any detections: 1. Compute the SHA256 and confirm the PE structure, architecture, subsystem, signed/unsigned, section sizes, imports, exports, resource directory shape. Use lcre query summary, lcre query imports, and lcre query strings. 2. Detect and unpack any embedded archives (WinRAR SFX, 7z SFX, MSI, NSIS, zip, rar, cab). List every extracted file with size and file type. 3. For each embedded script (.vbs, .ps1, .bat, .js, .hta, .lnk), print the full contents and summarize in one sentence what it does, commands executed, URLs contacted, files written, evasion flags used. 4. For each embedded EXE/DLL: - lcre query summary (arch, subsystem, packer indicators, section anomalies) - lcre query strings filtered for URLs, IPs, domains, registry paths, command-line templates - Any unusual PE version-info fields (OriginalFileName, InternalName, CompanyName, packer prefixes like LX_ are gold) 5. Produce a behavior chain: what runs first, what it drops, what it launches next, what network activity to expect, what parent/child relationships will appear on-endpoint. 6. Based on 1-5, propose 6-10 concrete detection ideas expressed as "the observable behavior an EDR will see", one sentence each. These will feed the next phase.
Do not execute the sample. Static analysis only.
Phase 3: Capture the clean baseline
Create a snapshot of the VM's OS disk for a known-clean state. Name it <vm>-clean-<timestamp>. This is the state we'll revert to between detonations.
Phase 4: Generate the detection rules from the triage findings
Using the detection ideas you produced in Phase 2, generate and deploy the D&R rules to my "malware-analysis" org. Each rule should be enabled on deploy. For every idea: 1. limacharlie ai generate-detection --description "<one-sentence idea>" 2. Review the generated YAML. Confirm event type + fields make sense. 3. Validate with limacharlie dr validate. 4. Deploy with limacharlie dr set --key <rule-name> --detect ... --respond ... --enabled.
Keep the rule names and descriptions synced with the behavior chain so we can map hits back to the triage report.
Phase 5: Stage and detonate the sample
Stage the same uploaded sample onto the VM. Since it's larger than Azure run-command's ~15 MB inline limit, use blob storage with a short-lived SAS URL: temporarily allow Storage.<region> in the NSG for the download, then close that rule immediately after. Land the sample at C:.exe and execute it from that directory. Wait up to 5 minutes for full detonation. Then list all LC detections in the last 10 minutes and map each detection back to the corresponding rule from Phase 4.
Phase 6: Debug the misses and fix rules
Any of my rules that did NOT fire: determine why. Read the actual events LC captured during detonation, compare them to the rule's match criteria, and identify the mismatch. Then, for each miss: 1. Rewrite the detection using limacharlie ai generate-detection with a better description of the observable behavior (as seen in the actual events). 2. Validate the new rule with limacharlie replay run against the original detonation window. Do not proceed until did_match: True. 3. Deploy the fixed rule with --enabled.
Report the root cause for each miss, what field/condition was wrong and why the original description didn't map to the real event.
Phase 7: Revert and re-detonate to prove live
Revert the VM back to the clean snapshot, then re-detonate the same sample. Verify all rules fire live in the "malware-analysis" org within a 5-minute window. Reminder from Phase 2 triage: server images without a default browser will silently swallow Start-Process $url primitives. If the sample relies on browser-launch for its C2 lookup, trigger the DNS manually via Resolve-DnsName after detonation so the C2-domain rule has an event to fire on.
Phase 8: Tear it all down
Delete the resource group and remove the sensor from LimaCharlie. Confirm the RG is fully gone before reporting done.
Phase 9: What did it cost?
Calculate the total Azure cost for the resource group. If Cost Management API returns no data yet (typical 8-24h latency), give me an estimate using the live Azure retail-prices API for each SKU/lifetime combination we actually used: VM hours, disk hours, NAT gateway hours + data, public IP hours, snapshot hours, storage account usage, and any auto-enabled services like Defender for Cloud. Show a per-resource breakdown, then re-check the actual cost 24 hours later.
440 N Barranca Ave #5258
Covina, CA 91723
5307 Victoria Drive #566
Vancouver, BC V5P 3V6
Stay up-to-date on all things LimaCharlie with our monthly newsletter.
This site is protected by reCAPTCHA and the Google Privacy Policy and Terms of Service apply.